Stovetop Chicken Bone Broth for a Thrifty Kitchen
One of the healthiest, most nutritious, and CHEAPEST traditional foods you can make for your family is chicken bone broth. The recipe is very forgiving and uses any chicken bones/pieces and vegetable scraps; plus, it’s a flavor powerhouse when added to soups, rice, and gravies!
I love striving for an economic, no-waste kitchen. Making bone broth is one of my favorite go-to recipes for having a thrifty kitchen. Plus, it is incredibly healthy and delicious!

This post contains affiliate links, which means I make a small commission at no cost to you. Click here for my full disclosure.
There are few aromas that fill the house with a sense of warmth and well-being and chicken bone broth has got to be at the top of the list. It’s so soothing and calming that I bet even just smelling it makes a person feel better.
I know not many of us can grow and harvest our own meat chickens. So, when you’re shopping for chicken at the store, gravitate toward buying a whole chicken instead of the cut-up pieces of breasts, drumsticks, and thighs.
Whole chickens are cheaper per pound and you can do the work of cutting off the chicken breast, drumsticks, and thighs yourself to save some money. (Or you could just roast the whole chicken.) You also have the benefit of saving and using your chicken carcass for making bone broth when you buy the whole chicken!!
I want to encourage you to make your own homemade chicken bone broth. The options at the store often have extra chemicals that we want to avoid and the flavor is not that great. When you make your own bone broth you can control the ingredients.
Health Benefits of Chicken Bone Broth
When it’s prepared properly, bone broth has the minerals from the bones, cartilage, marrow, and vegetables. The acid used in the process will draw out the calcium, magnesium, and potassium.
Additionally, if you’re able to add some chicken feet to your stockpot, the added gelatin and collagen have numerous health benefits. To name a few mentioned in the Nourishing Traditions cookbook, gelatin aids digestion and is used to treat people with colitis and Crohn’s disease.
It also acts as a protein sparer, which means that your body can utilize the complete proteins that are taken in. Therefore, gelatin-rich broths are especially important for those who can’t afford large amounts of meat in their diets.
Collagen is essential for good health. It is the protein responsible for healthy joints and skin elasticity. It even makes bones more dense! Read here for more on the health benefits of collagen.
Save Your Scraps!
If you want to make bone broth for pennies, save your chicken and vegetable scraps in your freezer until you get enough bones and veggie scraps to make a bone broth.
When we harvest our meat chickens, I like to save the necks and the legs/feet (which have been cleaned well) along with some other parts for use in making bone broth. The feet have a lot of gelatin and will give you a jelly-like broth when chilled.
Likewise, save your vegetable scraps in a freezer bag as you’re preparing your meals. Put your onion tops and tips (including skins), carrot tops and tips, celery tops and tips (root and all), parsnips, and any other vegetable scraps you have in the same freezer bag.
I like to make bone broth with at least three chicken carcasses at a time but if you have a smaller family you can use just one carcass. There’s not one “right” recipe for making bone broth! Just use whatever you have on hand.
What is the difference between chicken stock and chicken broth?
There isn’t much of a difference between stock and broth and often the terms are used interchangeably.
However, stock uses a specific recipe each and every time you make it to get a guaranteed specific-tasting result. Broth uses whatever you have on hand and the resulting flavor can change depending on what you use each time.
Should you add salt when making your chicken bone broth?
You can add salt if that’s what you prefer. I don’t like to add any salt when making chicken bone broth because I want to control the salt content when I cook.
Instructions for Making Chicken Bone Broth
1. Fill Your Stockpot With Chicken Scraps, Vegetable Scraps, and Water.
I’ve made chicken bone broth in an Instant Pot and in a Crock Pot but the stove top version is my favorite.
I canned raw chicken breast a few days ago and was left with nine chicken carcasses to use. I was able to squeeze six of the carcasses into my largest stockpot including the necks and legs/feet. But I put the other three in gallon size freezer bags for making broth later.
You can use any chicken bones for making bone broth.
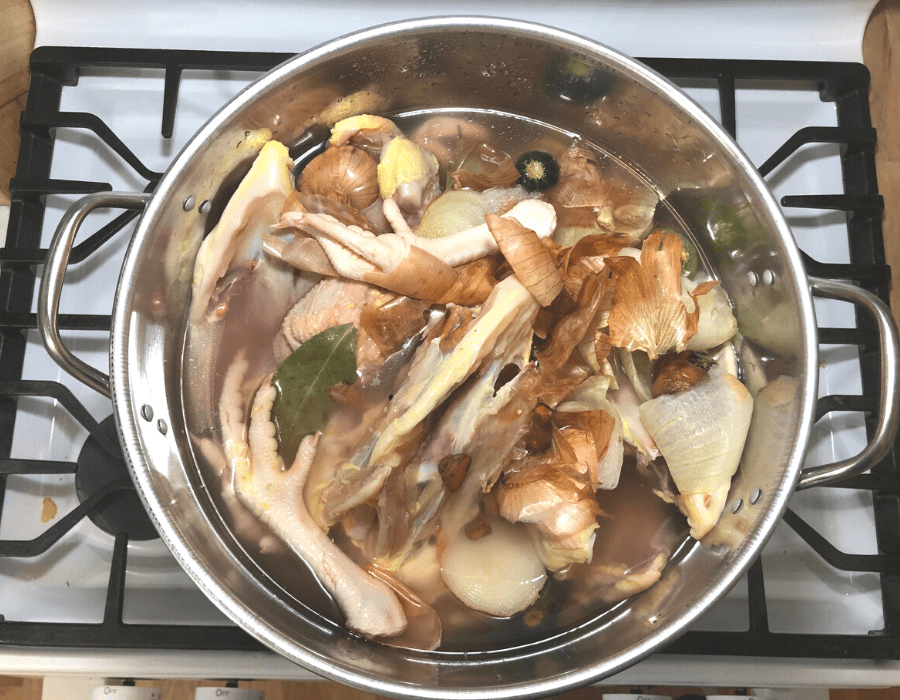
Additionally, I added all the frozen vegetable scraps I had saved in my freezer to the big stockpot. You can see onion skins, bits of carrot tops, and even a stray cucumber and zucchini top.
Once all the chicken and vegetable scraps have been added, fill the pot with water to just barely cover all the scraps. Add in a splash of homemade (or distilled) vinegar, lemon, or lime juice to acidulate the water. Also add in some whole peppercorns and three bay leaves.
* If you grow and harvest your own meat chickens, I do want to mention that the Nourishing Traditions cookbook says that Oriental cultures also add the chicken heads to make their broth. The gizzards are also used. Use that knowledge how you see fit.
2. Let It Sit for 30 Minutes to 1 Hour.
Let it all sit for 30 minutes to 1 hour so the acid can go to work on the bones. This time allows the acidic water to start getting the minerals out of the bones.
3. Bring to a Boil and Skim Off Foam.
Bring your stockpot to a boil after the timer goes off. You only need to boil for a couple minutes so that you can skim off any foam that rises to the top.
The scum/foam might be impurities either from the bones or the vegetables. My broth doesn’t always have scum or foam, so don’t be alarmed if nothing collects on the top of your stockpot.
I’ve found that the easiest way to remove the foam is to take a wooden spoon and slowly move the foam to the center of the pot using light strokes. Then you scoop out the foam with your spoon and discard it in the sink or nearby bowl. Keep removing until there is no more foam left.
4. Reduce Heat, Cover, and Simmer.
Once any foam is gone, reduce your heat, cover your stockpot, and let your broth simmer on low anywhere from 6 to 24 hours.
I know some people like to let their chicken bone broth simmer for 6 hours before they decant the broth and then they add more water to the bones and vegetable scraps to make another batch of chicken bone broth.
That’s fine if your goal is to get a large quantity of bone broth. You can re-use your bones to make several batches of bone broth if your goal is quantity.
I prefer to simmer my chicken bone broth for 24 hours. The longer you simmer the broth, the richer and more flavorful it will be.
I’m not a fan of using my stovetop in the middle of the night, so I turn off the heat when I go to bed. However, the pot is still quite warm to the touch the next morning when I turn it back on to simmer. My broth has always turned out well with this method.
5. Strain and Decant Chicken Bone Broth.
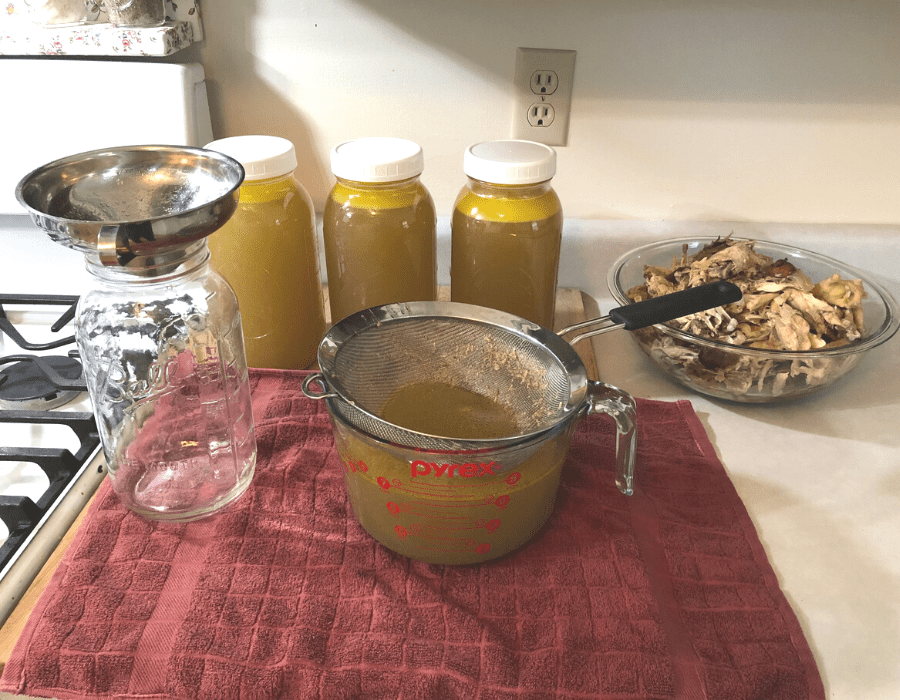
Use a slotted spoon or fine mesh sieve to scoop out the bones and vegetable scraps after your broth has simmered for the designated time. I like to use a stainless steel spider strainer to get all the largest pieces out first and then save those scraps in large bowls (see note below).
When you get all the largest pieces out, pour your chicken bone broth through a fine mesh sieve to get all the smallest bits out of your broth. I have a large mesh sieve that fits directly into my 8-cup measuring cup. As my measuring cup fills up, I’ll decant into half-gallon mason jars but use what you have on hand.
If I’m not planning on using my chicken bone broth within a few days, I will decant the broth into smaller jars and store them in the freezer or pressure can them.
Note: I hate to waste anything…even the scraps from making bone broth that uses SCRAPS! A lot of the minerals have been imparted into the bone broth but I think there is still some nutrition left in the scraps. Since the broth has simmered for 24 hours, the bones are very soft. I feed the scraps (veggies and all) to our three dogs. They eat up every bite and never have any issues. I think the bone broth gives them extra vitality, as well.
Optional (Leave in the Fat)
I like to leave the fat in the chicken bone broth because it has a good flavor and creates a good seal as it hardens on the top when the broth is chilled in the refrigerator. However, if you prefer to remove the fat from your chicken bone broth, you can use a fat separator.
Pour the warm broth into the fat separator and the liquid fat will rise to the top. Press the button on the handle to release the broth from the bottom (into a container of your choice) and stop pressing the button when you get to the fat line. You can pour your fat into another container and save it separately for cooking.
Ways to Use Your Chicken Bone Broth
Try using your chicken bone broth in these delicious ways:
- Use chicken bone broth as the base in soups and stews.
- Use broth instead of water to cook rice and pasta.
- Use broth instead of water or butter to cook vegetables.
- Try drinking it warm with a little bit of sea salt added. (It’s delicious!)
- Use it to make reduction sauces and gravies.
- Dehydrate your chicken bone broth and turn it into a bouillon powder.
Shop this post!
stainless steel spider strainer
Nourishing Traditions cookbook
Other Posts You May Enjoy
The Secret to Raising Livestock for Cheap!
Southern Black Eyed Peas and Collard Greens
Roast Chicken with the Neck and Feet
Pin it for later!


I love to make bone broth. I only use broth whenever it calls for water. Unless of course I’m making jello. Great recipe!! Thank you. It’s so much fun to challenge yourself to no waste.